Friday, December 4, 2015

Crochet Rainbow Unicorn

Crochet pink and purple unicorn with rainbow curly-q hair


I was making a few items for a friends little girl and what makes a better gift then a stuffed animal. I jumped on Ravelry and found this happy fluffy unicorn and got to work. Link below

www.1dogwoof.com/rainbow-crochet-unicorn-pattern


Great fun pattern that I really didn't have any problems following along with. You should know a few amigurumi crochet tricks to make it look amazing.

Tricks I used

Color Changing- all the limbs are crochet in continuous rounds so switching colors can look a little funny if you don't know how. I use youtube a lot when learning new crochet techniques. Here is a link for a concealing color change video. Love this method.

www.youtube.com/watchconcealingcolorchange

Decreases- This may sound funny but this one really makes a difference. Whenever I decrease (join two stitches from the last row) I use an invisible decrease. Instead of going through both loops in the stitches I only go through the front loops only, this makes your decreases less bulky and noticeable. Another video to help

www.youtube.com/watchinvisibledecrease

Attaching Amigurumi Limbs- This one is pretty easy, no video needed. I like to use safety pins to attach and hold all of my limbs on. Make sure that your color changes are all facing inward and your limbs are where you want them and stitch them on. I like to knot my yarn end and then weave it in.

Stuffing- Depending on your project you may want to lightly fill your pieces or you may need to seriously stuff that stuffing haha. The only part of the unicorn I didn't put poly fill in was the ears, I liked how they bent in and laid flat. All of my other pieces are overly stuffed and its a good thing. When you think your project is as full as you can get it, give it another good shove and you might find there is more room.

Things I did differently

The only thing I change on this pattern was the mane, I stuck with the curly-q's instead of the fluff. This was a project, There was a lot to make, attach and a ton of ends to weave in. In the end, totally worth it! I later added a small bow to this unicorns tail.


This was a really fun and longish project, the hair took the longest but it is beautiful. tHead on over to the facebook page and check out some of the other great things I've created. www.facebook.com/LyssaLousCustomCraft If you are interested in a crochet item just let me know. Thanks for looking everyone and enjoy!

Alyssa


Sunday, May 17, 2015

Handmade Children's Aprons

Girls Handmade Children's Aprons

My Daughter has always loved to help me in the kitchen. She loves to mix things and sing about every detail. What better way to encourage her into the kitchen then with her own fun little aprons! So I hopped on Pintrest and found this great free easy tutorial and it has the pattern for the pocket. I love this tutorial, it has a lot of pictures and good instructions to follow. Once you have one made you can branch out and do completely new things!

Ann Kelle Childrens Apron Tutorial

Things I did differently

My first apron I followed the tutorial exactly. The next apron I widened the bottom of the bib by 1.5 inches on either side. I honestly like this look better so I kept making them with this shaped bib from here on out.


This is my first apron (Please forgive the terrible picture) 


Here is a great picture of my daughter (Age 2) wearing her second apron. As you can see I also added a small strip along the bottom. I didn't have enough of the yellow flower fabric so I improvised.

After making these two I figured I would make a few more to try and sell at a small community craft sale, but it was a rainy day and I didn't make a single sale. I did, however, meet some great people :)
I made five aprons and gifted a few. Here are the three I have left.


This is older "My little pony" fabric I had in my scraps then I went and bought the blue to match it. There is also a beautiful decorative stitch along the waistband in the same blue color.


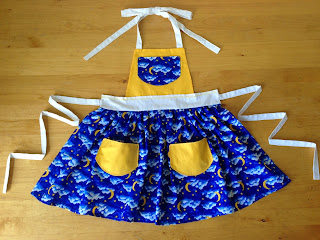
The blue stary night sky fabric was also among my scraps and I purchased the yellow to match. This one has a yellow decorative stitch long the waistband.


I love this one. I had only a little bit of the flower print in my scraps and matched it up with the bright purple. It has a decorative stitch in the same great purple along the waistband.


As soon as I pulled them out my little girl wanted to try them all on and start cooking! Thank goodness I could talk her out of that, she was easily talked into modeling them for me. 


Finally I went crazy and made this great ladybug apron with a heart shaped bib. The bib and skirt are lined with black gathered fabrid and it took me forever! The black fabric I had on hand was a little on the thick side which is why it was so difficult. It turned out really nice though. 


Aryiana says "Look at this fancy pocket, (ohhs and awws)" She didn't want to take the ladybug apron off. 

Lyssa Lou's Custom Craft

All four of these beautiful aprons are for sale in my Etsy shop, Lyssa Lou's Custom Craft. Head on over there and purchase one for the little kitchen helper in your house. 


I love these aprons! The tutorial is easy to follow and has a lot of pictures. Once you have done a few you can branch out and make an apron truly one of a kind. 

Thanks for looking and enjoy!

Alyssa


Friday, May 8, 2015

Magnetic Crochet Flower Bracelet

Magnetic Crochet Flower Bracelet 

A few weeks ago I created a magnetic flower necklace to use on our road trip to hold my dull yarn needles and safety pins (I use them as stitch markers). I was so thrilled with it that I couldn't help but share it on The Crochet Crowd and was shortly featured on their main Facebook page! The necklace got am amazing amount of attention! I loved reading through the comments.

If you would like to check out the blog post on the flower pendent necklace here is a link.
alexandalyssarigby.blogspot.com/crochet-magnetic-flower-pendent


I came across a great free bracelet pattern on Ravelry and fell in love with it. I have made this popcorn stitch flower before for hats and such. A perfect flower for a magnet. Here is a link to the pattern.
www.ravelry.com/patterns/library/spring-flower-bracelet-3

Things I did differently

Well, obviously the main difference is the small magnet in the center of the popcorn flower. Lets start with my magnets. I get my magnets from Home Depot. They have a great selection, I get a small pack of three magnets that look like thick washers. Next time I buy them I will snap a picture or them.

I used a G hook and a Simply soft yarn to make my first flower. When I switched to the off-white I also downsized my hook to an E hook and continued with this size the rest of the pattern.

Your magnet replaces the magic loop in this flower pattern. All you need to do to start this pattern is SC 8 around the magnet.

I also made my straps a little bit slimmer. There are only 9 SC across the first row and 10 SC across the rest of the way. I have a very small wrist so I also needed to shorten the straps. I only crochet 6 rows and then did my decreases.


This is a easy pattern to follow and now you can make your own amazing magnetic bracelet too. I had a lot of fun with this small project and can't wait to try out some different color combinations and hook sizes.


I would love to see your bracelets so if you make one head on over to my Facebook page and share your photos with me.
www.facebook.com/LyssaLousCustomCraft


Lyssa Lou's Custom Craft Etsy Shop

Coming Soon!

I am looking forward to add these great bracelets to my Etsy shop. Would still like to do some changes to the pattern before adding them. So, in the meantime, check out the other items in the shop.
www.etsy.com/shop/LyssaLousCustomCraft


Thanks for taking a look everyone and enjoy! Don't forget to like, share and subscribe!
Alyssa

Wednesday, April 15, 2015

Crochet Magnetic flower Pendent

Crochet Magnetic Flower Pendent Necklace


This great idea came to me after doing a project for my three year old. You might have seen it, it is also here on my Blog, its the Magnetic crochet fishing game. I took that idea and made a magnetic necklace to hold my dull ended yarn needles and safety pens (which I use as stitch markers).

The Flower Pattern
Came across this beautiful flower pattern on Ravelry and decided to give my idea a try. This is a great pattern with written instructions and a video! How nice is that?!  www.bhookedcrochet.com/crochet-flower-pattern/

My Magnets

I found my magnets over at Home Depot, yay! They came in a pack of three, they are small and round and look like a washer.
IMPORTANT: These are strong magnets so please don't use as a necklace if you have a pacemaker. Instead try making into a bracelet :)

Here is a link to my new how to and crocheting a magnetic bracelet.
alexandalyssarigby.blogspot.com/magnetic-crochet-flower-bracelet

Things I did differently

This is a really easy concept, once you have it down you can switch your pattern and making other flowers. Most crochet flowers either start with a chain and sl st to make a loop or the good old magic loop which I use on everything, We will be skipping over making a loop (you have a magnet loop) and going right to how many SC are suppose to be in loop.

For this pattern: Round 1: connect yarn and SC 7 around your magnet and join with a Sl st

After completing my flower I crochet a small circle (to cover up the back and help the flower keep its shape. I strung my cord between a pedal and just stitched my circle and flower together. Nice and simple.

My Cord

I used a small bit of cord I had and decided to make a sliding knot necklace. No metal for my magnet to get stuck to. Here is a link to a short YouTube video on how to do those knots.
www.youtube.com/watch?v=zJzF1IeQQck


Keep In Mind

Keep in mind that if you put too many Sc around your magnet it will no longer hold your needles and things.


Now my needles and things wont get lost!
Thanks for taking a look everyone and Enjoy! Don't forget to subscribe!

Crochet Magnet Flower Bracelets

If you love this idea but cant use a necklace due to a pacemaker then click on the link below. This is a pattern and tutorial to make a button on bracelet with a magnet in it as well.

Update 1/18/2019
Crochet Magnet Heart Needle Keeper Necklace

A few months back I got a custom order in my Etsy store for a different magnet necklace. Together my customer and I came up with the idea of a heart necklace for one of her close friends and a few hours later I had completed her request. \


The heart pattern I found over on Ravelry for free. I made two hearts, one around the magnet and the other is the backing. I also improvised an edging for my two hearts in black. I went out and bought faux leather cording to make the necklace and other necklaces in the future. 


This is an easy concept and you can really create any necklace you want. Be creative and make what you love.

Alyssa Rigby

Lyssa Lou's Custom Craft


Tuesday, April 7, 2015

Crochet Magnetic Fishing Game Set

Magnetic Fishing Game

We are going on a road trip, an eight hour road trip with our three and a half year old. I am honestly a little terrified, so way in advance I started looking for things I could sew or crochet to help keep her busy. I came across this pattern on Ravelry.


Things I did differently

This is a great pattern. I used an F hook and skipped the tail.

Tail
I used this small heart pattern, found on Pintrest. I made two of them and stitched them together, half way, almost to the bottom point of the hearts. Then I place the hearts onto my fish with a heart bottom on either side and stitched it onto my fish.


Fishing Pole
Came across this magic wand pattern on Ravelry and loved that it was made around a chop stick (I used a wooden dowel, it was longer). I figured it could easily be used as a fishing pole and much better then a stick and string.

Note: Working on the handle, I stopped at row 17 (right before my three rounds of sl st) and stuffed and inserted my stick. The next rows are a little bit smaller so I figured it would be easier to do this step now. Ok, all I did was take some poly-fill and wrap a small elastic around the bottom to hold the stuffing and wrapped it nice and tight and put another rubberband on that end. This easily slid into my wand end.

Dont forget to attach your fishing string into your end before closing


String and magnet
I picked up my magnets from Home Depot, they look just like washers (a little thicker) and come in a pack of three! yay! I SC around my magnet, just be sure that you don't put too many SC around it or your magnet wont pick up the fish. I did another round of SC then did a round of decreases and did a nice long chain all the way up.


I plan on making a few of these adorable sets and selling them on my etsy page. Hop over there and check it out.


Here is my daughter testing them out for the first time. She had a lot of fun with it. I hope she spends a lot of time playing with it in the car.


Thanks for looking everyone and enjoy!


Thursday, February 5, 2015

Crochet Womens Peeked Hat

The Crochet Crowd Challenge For January 2015
Women's Peeked Hat

As one of my New Years Resolutions I decided I wanted to participate in (hopefully) all of The Crochet Crowds (facebook crochet group) monthly challenges.  January was a beautiful crochet peeked hat. Link to pattern  crochetchallenges.com/next-challenge-january-2015 peeked hat

The challenge is obviously closed but if you go down to the picture and click on it it will take you to the written pattern or you can use the video tutorials just below the picture link.

Here is my first hat. I used Caron Simply Soft yarn but again don't have the color name I added some crisp white buttons. This hat turned out a little small for my head but it fit my daughters.


So I decided to make my daughter one in pink. Seriously, she saw the pink yarn and didn't want to leave my side. As soon as the hat was off my hook she had it on her head and I cant seem to hide the thing well enough. She always seems to find it and even wears it to bed at night.


And then I finally decided to make one for myself to match my chevron scarf I had made a few months earlier. I used Caron simply soft in a bright aqua and white with two white buttons.


These were a lot of fun to make and not too hard once you have the pattern figured out.

Thanks for looking and enjoy

Happiness is Homemade
Alyssa


Wednesday, February 4, 2015

Minion Hats

Minion Hats

These hats I made for three special kids that I love and miss. These hats were sent to Miami to my dear friends grandchildren.

I looked for minion hat patterns but didn't like anything I found so I went with what I know. All I did was crochet a basic double crochet childrens beanie. I counted how many rows I had to work with and sorta guessed about were to change colors.

I did, however, use a pattern for the eyes. Link www.repeatcrafterme.com crochet-minion-hat-pattern
It is a great full hat pattern but I didn't need really warm hats. I did make a small change to the eye pattern. I did a button instead of crocheting in black. So all I did was follow the pattern starting in brown instead of black. Super easy.

The boys are twins so I really wanted two hats that looked the same but could be told apart. How easy! The number of eyeballs.


After making these two amazing hats I had to make one for their little sister. Her hair is just a small bit on top with a small bow. Its so cute!


Now for my favorite part! Picture of the people I love enjoying the things I have created for them. So glad these minions are happy.


This was a easy fun project that I would love to do again. Maybe one for my daughter :) I had a lot of creative freedom and really enjoyed putting these together.

Thanks for looking and enjoy

Happiness is Homemade
Alyssa

Chevron Lace wrap

Chevron Lace Scarf

Alright, so I have finally settled into our new apartment in Denver Colorado and now have time to update and post all of the things I have made over the past.....4-5 months. Wow, I haven't posted in a very long time. Anyways here we go.

The first one I made was for my best friend. She wanted something black that would match a lot of her stuff. She is a Florida girl so I needed to find a pattern that was light and full of beautiful holes. I was so excited to finish this scarf and give it to her that I didn't even snap a really good picture. Oh well. This one will do.

I found the crochet pattern on Ravelry for free. Here is the link.

http://www.ravelry.com/patterns/library/chevron-lace-wrap


Things I did differently

After starting this pattern I quickly found out that this scarf pattern was not looking like a scarf at all but more like a blanket so I had to cut down my foundation chains to 51 and followed the chart (or written pattern).


After the first scarf I decided to make a few more but with a slightly thicker yarn so I cut down my foundation chain to 31 and followed the pattern.

This one I made as a (very late) Christmas gift for a dear friend in Miami Fl. She had asked a few months earlier if I would make her some hat and scarf sets, but more on those later. This is a dark purple yarn I found for cheap in a little thrift shop (oh I bought so much yarn there) in Warren Ohio. I finished it with some leftover white thick fluffy yarn.


This next one was sent along in the package to Miami.


This one is for an amazing lady I use to know in high school. I held onto this red yarn for so long before making it into this beautiful scarf. The red is hand dyed 100% wool and I added some leftover Lion Brand Homespun thick&quick (Its black and grey but I don't have the color name).


And then, after what felt like months of want a pretty scarf of my own I finally had the time!
Bought this yarn on a great sale at Michael's its Red Heart Soft Yarn in Deep sea and I added the white fluffy yarn around the edges. Its my favorite scarf!


This pattern took a little while for me to get use to but after a few rows I got the hang of it. This is such a beautiful pattern and its really not that much work. I know I will be making more of these.

Thanks for looking and enjoy!

Happiness is Homemade
Alyssa