My Daughter has always loved to help me in the kitchen. She loves to mix things and sing about every detail. What better way to encourage her into the kitchen then with her own fun little aprons! So I hopped on Pintrest and found this great free easy tutorial and it has the pattern for the pocket. I love this tutorial, it has a lot of pictures and good instructions to follow. Once you have one made you can branch out and do completely new things!
Ann Kelle Childrens Apron Tutorial
Things I did differently
My first apron I followed the tutorial exactly. The next apron I widened the bottom of the bib by 1.5 inches on either side. I honestly like this look better so I kept making them with this shaped bib from here on out.
This is my first apron (Please forgive the terrible picture)
Here is a great picture of my daughter (Age 2) wearing her second apron. As you can see I also added a small strip along the bottom. I didn't have enough of the yellow flower fabric so I improvised.

After making these two I figured I would make a few more to try and sell at a small community craft sale, but it was a rainy day and I didn't make a single sale. I did, however, meet some great people :)
I made five aprons and gifted a few. Here are the three I have left.This is older "My little pony" fabric I had in my scraps then I went and bought the blue to match it. There is also a beautiful decorative stitch along the waistband in the same blue color.
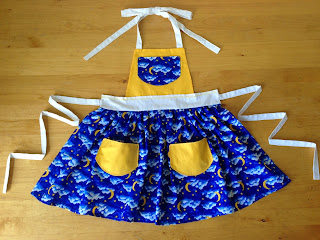
The blue stary night sky fabric was also among my scraps and I purchased the yellow to match. This one has a yellow decorative stitch long the waistband.
I love this one. I had only a little bit of the flower print in my scraps and matched it up with the bright purple. It has a decorative stitch in the same great purple along the waistband.
As soon as I pulled them out my little girl wanted to try them all on and start cooking! Thank goodness I could talk her out of that, she was easily talked into modeling them for me.


Finally I went crazy and made this great ladybug apron with a heart shaped bib. The bib and skirt are lined with black gathered fabrid and it took me forever! The black fabric I had on hand was a little on the thick side which is why it was so difficult. It turned out really nice though.

Aryiana says "Look at this fancy pocket, (ohhs and awws)" She didn't want to take the ladybug apron off.
Lyssa Lou's Custom Craft
All four of these beautiful aprons are for sale in my Etsy shop, Lyssa Lou's Custom Craft. Head on over there and purchase one for the little kitchen helper in your house.
I love these aprons! The tutorial is easy to follow and has a lot of pictures. Once you have done a few you can branch out and make an apron truly one of a kind.
Thanks for looking and enjoy!
Alyssa


